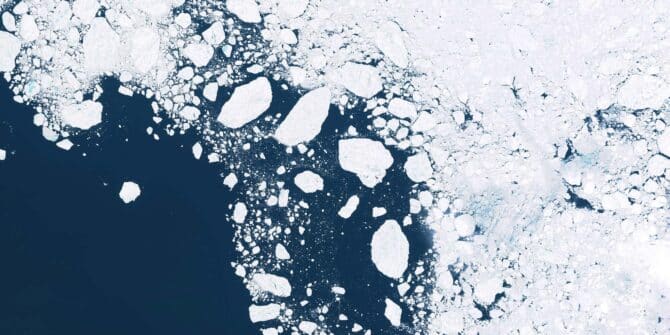
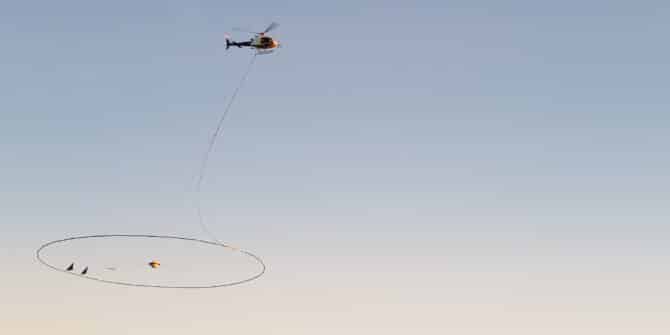
Geosoft - Exploring With Data

Exploring with Data

About this Blog

Email Us

Get Updates by Email

Enter your email address:


Subscribe Bookmark and Share


http://twitter.com/Geosoft
http://twitter.com/explorernews

Google
WWW GEOSOFT Blog

Archives

  • May 2012
  • April 2012
  • March 2012
  • February 2012
  • January 2012
  • December 2011
  • November 2011
  • August 2011
  • June 2011
  • March 2011

Categories

  • DAP
  • Exploration Data Management
  • Geochemistry
  • Geology
  • Integrated Geosciences
  • Mineral Exploration
  • Oasis montaj
  • Target
  • Target for ArcGIS
  • Tips

Recent Posts

  • Drag and drop shortcuts in Oasis montaj - time savers and hidden gems
  • 3D Earth Modelling in the Cloud: The Geosoft VOXI development story
  • Free Sources of Geoscience Data
  • Target for ArcGIS Sneak Peek
  • Gridding algorithms - which one do I choose?
  • Getting the most from the Support Knowledge Base
  • Coordinate Systems: Set it and forget it
  • Preparing for PDAC 2012
  • Updating Target Plan and Section Maps
  • Displaying Drill Hole Data More Effectively in 3D

More Geosoft

http://www.geosoft.com

Links

Earth Explorer

What's New 2011 - 3D clipping

The Geosoft 2011 Update is now available. Look forward to a few new articles here about some of our favourite new features and functions.

Today's tip: In Oasis montaj, Target, and Extensions for ArcGIS, you can now use the 3D view clipping tools to clip all 3D object types, including: drillholes, symbols, grids and surfaces. You can also select and clip multiple groups at once.

Posted by Natalie Green on 22 June 2011 in Oasis montaj, Target, Target for ArcGIS, Tips | Permalink | Comments (0)

Digg This | Save to del.icio.us

How do I use the Mask channel in a drillhole project?

When you import your data into a Target project, you will notice that all of the output Geosoft databases (*.gdb files), except for the survey database have a Mask channel.

A Mask channel generally holds binary data and is usually of data type byte.  Mask channels will either contain the value (usually 1) or dummy (*).  The Class for mask channels is indicated by MASK in the Edit Channel dialog.

Mask1


If a row is populated with the value 1 for the Mask channel, that data is not being masked.  When the row has a * in the mask, it is only masked if the user selects the mask option.

Mask2


Collar database

The Mask channel in the collar database works differently than the Mask channel in other drillhole databases. In drillhole projects, the Mask channel in the collar database indicates which holes are selected. Selected holes will have a value of 1 for the Mask channel and unselected holes will have a dummy (*). There are several different ways to select and unselect drillholes.  These options are found under:

Target Standalone (and Oasis montaj with Drillhole Plotting extension)

  • DH-Data menu > Select Holes

Target for ArcGIS

  • Target Drillhole toolbar > Selection (first 7 options)

Only drillholes that are selected will be included in output plots.  Additionally, processing like 3D gridding and Channel Math will only be performed on selected holes.


From-to or Point Databases

The Mask channel in from-to or point drillhole databases works differently than the mask channel in the collar database.  In these types of databases, the Mask channel can be used to mask data that is being plotted.  You first have to indicate that you want to use the Mask channel for plotting/export.  This is done through:

Target Standalone (and Oasis montaj with Drillhole Plotting extension)

  • DH-Data menu > Preferences > Use mask channel for plotting/export? 

Target for ArcGIS

  • Target Drillhole toolbar > Target Project > Preferences > Use mask channel for plotting/export?

If this parameter is set to Yes, you can mask data that is displayed in plots.  For example, the below plan map was created showing a single drillhole trace and the rock patterns along the trace.  No data is being masked in the geology from-to database.

Mask3

You can adjust the values in the Mask channel for all the holes in the project using some of the other selection tools.  Let’s say that you only want to plot the rock types “Ca” and “Sif” on your output map.

Target Standalone (and Oasis montaj with Drillhole Plotting extension)

  • Make the Geology database the active table.
  • DH-Plot > Select Data by Code.
  • Select the appropriate channel and other parameters in the dialog > OK.
  • The Select Codes dialog will open and you can select the codes of interest.

Target for ArcGIS

  • Make the Geology database the active table.
  • Target Drillhole toolbar > Selections > Select Data by Code.
  • Select the appropriate channel and other parameters in the dialog > OK.
  • The Select Codes dialog will open and you can select the codes of interest.

Mask4

Result of the “Select Data by Code” in the database...

Mask5
Now if the plan map is recreated, it looks like this...

Mask6

Other selection tools that can be used for from-to and point databases are:

  • Select Data From Map (only in Target or Oasis montaj)
  • Select Data by Range


The Mask Channel can quickly be reset to all 1’s or dummies:

  • Reset Mask Channel

Posted by Sandra Beaurain on 14 March 2011 in Oasis montaj, Target, Target for ArcGIS | Permalink | Comments (1)

Digg This | Save to del.icio.us

3D vectors for contours created from a grid

Recently, some of us here at collaborated on a workflow to export topography contours to a 3D vector format.  We thought it'd be a useful one to share with our customers.  Here's how you go about it.

When creating the contours for the grid, modify the Options:

  • Set the suppression density to 0 mm.
    This will ensure that the contour lines are closed.  
  • For "hi-low annotation", select none.
  • For label display, select no labels.
  • Optionally define smoothing for the contours

Oasis montaj and Target

In Oasis montaj and Target, the contour option is found under Map Tools > Contour > Contour.  Once the contours are added to the map, select the contour group in the View/Group Manager Tool and export the selection to a 3D Shapefile through Map > Export > ArcView Shapefile.

MapInfo users can export the contour group to a TAB file and the Z value will be the value of the contour level.

Extensions for ArcGIS

In Target for ArcGIS, the contour option is found on the Target Surface toolbar. In Geochemistry for ArcGIS, the contour option is found in the Gridding menu.  Both Target for ArcGIS and Geochemistry for ArcGIS allow you to create the contours directly in Shapefile format.

Geosoft 3D Viewer and 3D DXF export

The 3D Shapefile can be added to the Geosoft 3D Viewer (Add to 3D menu > Imports).  The 3D Shapefile displayed in the 3D Viewer can be exported to a 3D DXF (Export menu > AutoCAD DXF File).

3D_contours

Posted by Sandra Beaurain on 11 March 2011 in Oasis montaj, Target, Target for ArcGIS, Tips | Permalink | Comments (0)

Digg This | Save to del.icio.us

Data Quality using Profiles

When I receive a new point or line-based dataset, often my first action is to use Oasis montaj or Target to look at the channel profiles in a Geosoft database (after importing the data into a Geosoft database, if required).  This is a valuable way to check the data quality and get familiar with the data.

Profiles of the coordinate channels (x,y) help to quickly identify location errors from missing values, reversed x and y coordinates, or simple typos.  Line data coordinates usually have smooth and consistently increasing (or decreasing) profiles.

Db prf x and y 

Profiles of the data can be used to look for strange values and noise. Selecting any suspicious locations in the profile window will jump to that location in the database table.

Db prf data 

I often select the line header cell and use the Page Up and Page Down keys to scroll between adjacent lines in the database for a quick way to review the data.

If this data format is being collected regularly, then saving the database view (Database > Save Working View...) makes the review of data channels more efficient next time.

Posted by Natalie Green on 28 February 2011 in Oasis montaj, Target, Tips | Permalink | Comments (0)

Digg This | Save to del.icio.us

Can I Delete That File?

Geosoft stores all kinds of information in files and datasets (a dataset is a collection of related files). Some of these files are very important and should not be deleted except with extreme caution - like GI (Grid Information) files which store Coordinate Systems and other important details.

Some other files are temporary and I am often asked by users about which file types are safe to delete at the end of a project.  Here's a few from my list.

  • _filename.ext -- File names that begin with an underscore are usually temporary files that are recreated when the function is re-run, such as gridding and contouring. One exception to watch for: ITR colour files for geochemical database channels (e.g _Cu.itr).
  • i0, i3, i4, o0, o3, o4 -- These are import and export templates.
  • GD~ -- This file is a temporary database file. It often disappears when the GDB is closed.
  • INI -- Configuration settings.  Be careful not to delete custom INI files in Target and Target for ArcGIS.
  • GM -- Geosoft MAP extension for Geosoft's MapInfo plugin.
  • MDF -- Map definition file, used in map creation.
  • LOG -- Log file or general report, ofen related to imports in Target and Target for ArcGIS.

Posted by Natalie Green on 11 November 2010 in Oasis montaj, Target, Target for ArcGIS, Tips | Permalink | Comments (0)

Digg This | Save to del.icio.us

Geographic Channel Formats

A question of how to georeference a raster image was recently raised in our Geonet forum.  There's an FAQ on How To: Warp or Georeference a Grid or a Database that provides some basic information on georeferencing.

This question also reminded me of a related topic: Using numeric channel formats in Geosoft databases (*.GDB) to convert from geographic number formats (DD.MM.SS.ssss) to decimal degrees (DD.dddd) or vice versa.

Here's how you can simply convert coordinates between these two common formats:

1. Create a new channel and set the display format to Geographic. 

Geographic channel 

2. Enter the Long and Lat coordinates of your point(s).

Long lat 

2. Right click on the channel header and select Edit...

3. Change the format to Normal and set Decimals to 6, then click OK.  Do the same for the other coordinate channel.  The coordinates are now in decimal degrees.

Dec degrees 


Posted by Natalie Green on 04 October 2010 in Oasis montaj, Target, Tips | Permalink | Comments (1)

Digg This | Save to del.icio.us

New Image Caching in Maps

Oasis montaj and Target 7.2.1 updates are now available and include a number of improvements.  One of the nicest changes is one that you may not notice.

Sometimes maps with large raster images take a long time to open or redraw. This is the case even if the image is masked, and also when you pan or zoom. It can make working with large raster images frustrating.

With the latest update, Oasis montaj and Target include improved performance using image caching in maps. Maps with large raster images will take a bit longer to open at first (you might notice the message "Caching grid") but once the map has opened, zooming and panning on the map is lightning quick.

Posted by Natalie Green on 24 September 2010 in Oasis montaj, Target | Permalink | Comments (0)

Digg This | Save to del.icio.us

Create a polygon (*.PLY) from a shapefile (*.SHP)

In Target and Oasis montaj, sometimes you need to create a polygon file for windowing (i.e. windowing a grid to a polygon to make a new smaller grid) or masking (i.e. applying to mask to a database channel, or hiding a map group outside a polygon boundary). 

The first step is creating the polygon *.ply file.  If you are starting with an ESRI Shapefile, [you can import the Shapefile to a map, and use Create PLY File from Map Group. However, if the Shapefile contains polylines, rather than closed polygons, or if there are many items in the map group and editing would be required to isolate the polygons] then you can “blow up” a polygon shapefile when you import it to a Geosoft database.  This means that you will have a point for every polygon vertex or node, instead of just a record for the centre of the polygon [or polyline]. 

First, import the Shapefile to a new database using Database > Import > ArcView Shapefile(s).  In the ArcView Shape File Import dialog, set Import data to to "New database with shape database(s)".  When the import is complete, you will see a new {filename}_Shapes.gdb, where each polygon will be stored in a separate line in the database.

[To create the *.PLY file, export to an XYZ file and change the line references to poly tags:

poly 1
-17338.70    52620.96
-10705.64   -13104.83
-13508.06   -12096.77
-31552.41    53427.41

And remember to add the coordinate system information if you are working in multiple coordinate systems.]

Posted by Natalie Green on 22 September 2010 in Oasis montaj, Target, Tips | Permalink | Comments (5)

Digg This | Save to del.icio.us

Inverse Colour Tables

Oasis montaj and Target users can modify Geosoft colour tables to create custom colour tables, as well as ZON and ITR files (which assign colours to a range of data) using the Image Colour Tool.  

However, there is no button here to reverse the colour scheme using the Image Colour Tool. 

You can download ready-to-use inverse colour tables for all the Geosoft standard colour tables from the Geosoft website: [new link!] http://updates.geosoft.com/downloads/files/extras/tbl.zip

Just place these new files in your program "tbl" folder.

Posted by Natalie Green on 17 June 2010 in Oasis montaj, Target | Permalink | Comments (3)

Digg This | Save to del.icio.us

Copy and Paste

Oasis montaj and Target maps are easy to share and incorporate in reports and presentations.

You can copy a map directly into Microsoft Word or PowerPoint.

  1. While in Shadow Cursor mode, right click on the map and select Copy.
  2. In Word or PowerPoint, select Paste Special (instead of Paste), and choose Picture (Enhanced Metafile).

You can also copy text (including font and formatting) from a Microsoft document to a Geosoft Map.

  1. Select the text and choose Copy in your Microsoft document
  2. In your Oasis montaj map, select Paste.

The new group is also an EMF (enhanced metafile) so it can be resized but not edited.

Map with pasted text
 

Posted by Natalie Green on 31 May 2010 in Oasis montaj, Target, Tips | Permalink | Comments (0)

Digg This | Save to del.icio.us

« Previous | Next »